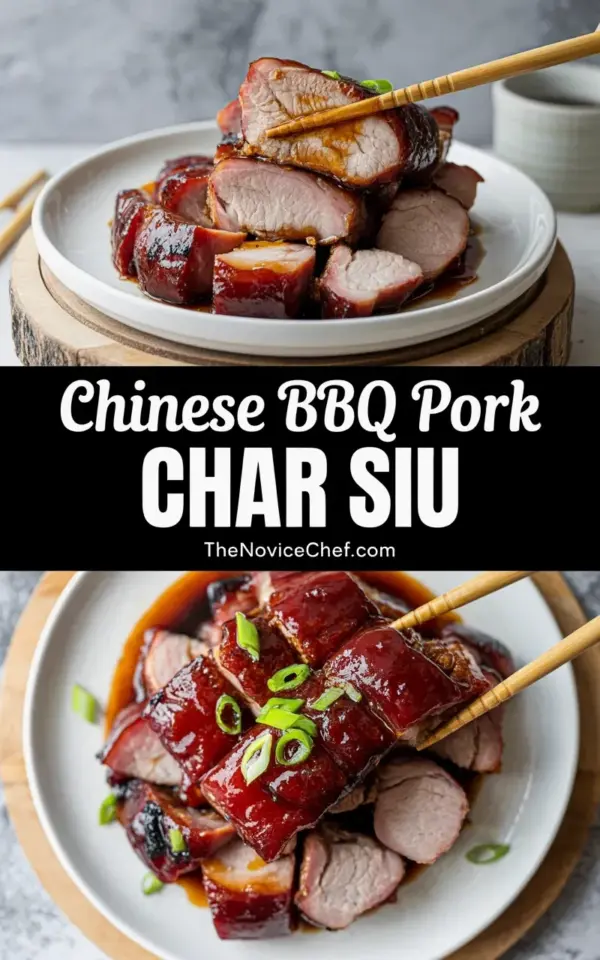
I have a confession. My first few attempts at homemade char siu were sad, pale, and frankly embarrassing. I followed every recipe perfectly, slow roasted the pork, basted it carefully, and ended up with meat that looked boiled instead of roasted. That dark, sticky, almost burnt crust you see on the photo above? The one with the deep red-brown glaze and those perfect charred patches? I couldn’t get it. And for a long time, I thought my oven was broken or my marinade was wrong. Turns out, I was missing one simple step that makes all the difference.
The biggest char siu mistake home cooks make (not enough char)
Here’s the thing everyone gets wrong. They treat char siu like normal roast pork. Low and slow, gentle heat, perfect for pulled pork or Sunday dinner. But char siu is different. That smoky, caramelized crust isn’t an accident. It’s the whole point. The glossy, slightly burnt edges are where the flavor lives. If you pull the pork out when it’s just cooked through, you get tender meat but zero of that iconic Chinese BBQ taste. Look at the photo: see those dark charred patches on the meat? That’s not a mistake. That’s the goal.
Honestly, I used to be so scared of burning the pork. I’d hover by the oven, pulling it out the second the internal temp hit 145°F. And every time I’d slice into it, the color would be a uniform reddish brown with no contrast. No char. No crunchy bits. Just soft, one-note meat. Not gonna lie, it was depressing. Especially when I saw the glossy, glistening char siu at my local Chinese takeout.
The easy fix: a quick high heat step at the end
So what’s the fix? It’s stupidly simple. After you’ve roasted the pork low and slow (300°F for about 45 minutes), you crank the heat. Like, all the way up. Broil it. For three to five minutes. That’s it. That short burst of intense heat caramelizes the sugar in the glaze and chars the edges without drying out the inside. The photo shows it perfectly: the meat is cut into chunks, tender and juicy inside, but the surface has those deep red-brown patches. That’s the broiler doing its job.
I learned this trick from a Chinese home cook on YouTube. She called it “the finishing touch.” And she was right. Without that final blast, you’re just eating sweet pork. With it, you get layers of texture and flavor. I’ve tried it ten times since then, and it works every single time. Broil on high, watch it like a hawk (sugar burns fast), and pull it out when the edges start to blacken just a little.
How to get that sticky, caramelized crust without burning
Now, you might be thinking, “Won’t broiling just burn the whole thing?” And yes, it will if you walk away. But here’s the trick: use a glaze that’s not too sugar-heavy, and baste it one final time right before broiling. My go-to glaze is a mix of hoisin sauce, honey, soy sauce, and a touch of red bean curd for that classic color. Brush it on thick, then broil. The sugar bubbles and darkens, but the liquid in the glaze keeps it from turning to charcoal.
Key pointers for a perfect crust:
- Leave the pork on a wire rack over a foil-lined pan (airflow is critical for even char).
- Apply a generous final glaze layer right before broiling.
That extra coating gives you the sticky, glistening finish you see in the photo, the one with the chopsticks piercing through the meat. - Position the rack about 6 inches from the broiler element. Too close and you get smoke. Too far and you get warm pork.
- Rotate the pan halfway through if your oven heats unevenly. I’ve had one side char beautifully while the other stayed pale. Not ideal.
Let me tell you a weird thing I noticed. The first time I did this, I got nervous and opened the oven door every thirty seconds. Mistake. The heat escaped, and the char took forever. Now I set a timer for 3 minutes, check, then add 1-2 more if needed. Trust the process. The broiler is your friend, not the enemy.
Why the char matters for smoky flavor (and texture)
Here’s a little science that changed how I cook. The charred edges aren’t just for looks. When sugar hits high heat, it undergoes the Maillard reaction and caramelization. That creates hundreds of new flavor compounds, nutty, smoky, slightly bitter, and deeply savory. Those compounds mix with the pork fat and the soy-based marinade to make something magic. Without the char, you lose that whole dimension. The meat becomes flat and sweet, not complex.
I actually tested this side by side once. Roasted one batch at low heat until done, and another batch with the final broil. The difference was night and day. The broiled batch had a texture contrast too: crusty outside, tender inside. The unbroiled batch was uniform and boring. My husband, who claims he can’t taste subtleties, said “this one tastes like takeout” about the charred one. That’s the win.
My complete char siu method for tender, juicy homemade pork
Ok so here’s the full process, start to finish, so you can nail it at home. First, pick the right cut. Pork shoulder (butt) works great because it has enough fat to stay moist. Boneless country-style ribs are even better for quick cooking. I use about 1.5 pounds. Slice the meat into long strips, about 2 inches thick, so the marinade penetrates.
Marinate overnight if you can. My mix: 3 tablespoons honey, 2 tablespoons hoisin, 2 tablespoons soy sauce, 1 tablespoon dark soy (for color), 1 tablespoon Shaoxing wine or dry sherry, 1 teaspoon five-spice powder, 1 teaspoon red bean curd (fermented tofu), and a few cloves of minced garlic. Whisk it up. Coat the pork. Refrigerate. The red bean curd gives that deep reddish hue you see on the glistening meat in the photo, the one with fresh scallions sprinkled on top.
Roast at 300°F for 40-50 minutes, flipping and basting halfway through. Then remove, baste again thickly, and broil on high for 3-5 minutes until charred and sticky. Let it rest for 10 minutes before slicing. The resting time is crucial. I once sliced too early and lost half the juices onto the cutting board. Not again.
Serving ideas: rice, noodles, and that beautiful garnish
Look at the bottom photo in the article image. The char siu chunks are piled on a white ceramic plate, scattered with bright green scallions. That’s the perfect finish. I serve mine over steamed jasmine rice with a side of blanched bok choy, or tossed into noodles with a drizzle of extra hoisin. The scallions add freshness and a bit of bite that cuts through the richness.
One more thing: don’t skip the resting and slicing against the grain. You’ll get those tender, juicy pieces that look so good in the photo. And honestly, the char siu keeps well in the fridge for a few days. I’ve been known to make extra just so I can have it cold, sliced thin, on a sandwich the next day. It’s almost better that way. Almost.
Anyway, give this method a try. The broil step is small, but it’s the difference between okay char siu and the kind that makes people ask for the recipe. Save this for your next Asian dinner, and don’t be afraid of a little char.
#char siu #chinese bbq #bbq recipe #homemade pork #asian food