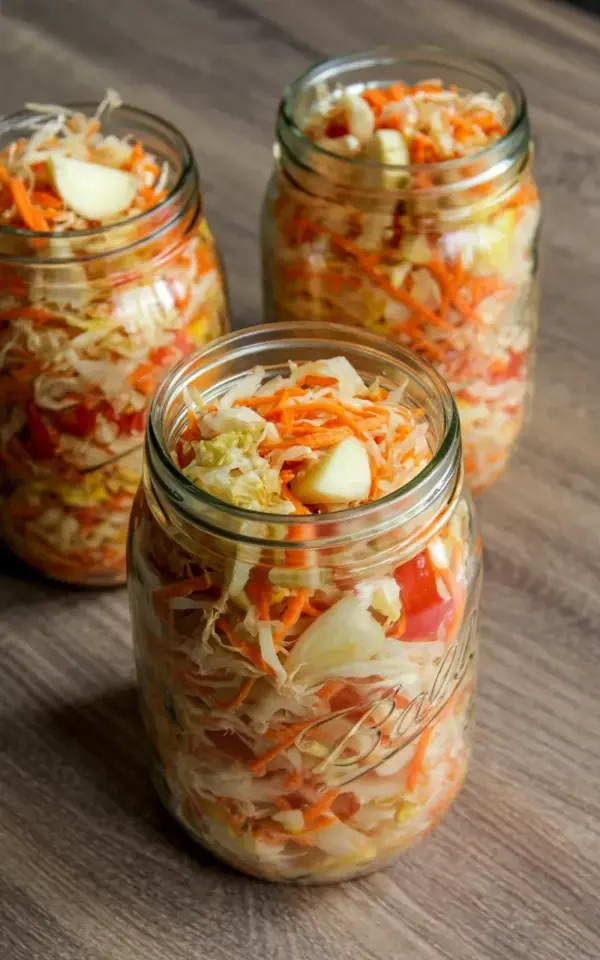
Three identical wide-mouth mason jars sit on a light brown wooden counter, packed tight with ribbons of white cabbage, bright orange carrot shreds, and deep red tomato chunks. A few lone garlic cloves peek out from the layers, and the glass lids sit flush on top. If you have been staring at pictures like this, wondering if you can actually make homemade sauerkraut without it turning into a science experiment, here is the truth: you absolutely can. This particular batch is my go-to recipe for beginners because it uses simple vegetables, basic mason jar recipes, and a whole lot of forgiveness.
Fermentation is not about perfection. It is about setting up the right environment and then getting out of the way. The biggest reason people quit after their first batch is because they make a few predictable errors that turn their precious fermented vegetables into a sad, mushy mess. Let me walk you through the exact mistakes I made so you do not have to repeat them. Grab a cabbage, clear off a counter, and let us get you fermenting with confidence.
Mistake Number One: Using the Wrong Salt or Guessing the Amount
Salt is not just a flavoring agent here, it is the gatekeeper. It prevents the bad bacteria from taking over while allowing the good lactic acid bacteria to thrive. Do not use regular table salt because the anti-caking agents can make your brine cloudy and sometimes bitter. Look for a pure salt without additives, like sea salt or kosher salt, and here is the crucial part, weigh it. Do not guess.
For every two pounds of vegetables, you want about one and a half tablespoons of salt. That is a specific ratio that works reliably every time. Sprinkle it over your shredded cabbage, carrots, and tomatoes, then massage it in with your hands (clean hands, obviously). The salt draws out the water from the vegetables, creating the brine that covers everything. I learned this the hard way with my first batch, I used a generic “pinch” approach and ended up with fermented vegetables that were so salty they were practically inedible. It was a waste of good produce and a week of waiting.
The Packing Problem: Why Your Vegetables Float and Mold
One of the most common issues in sauerkraut recipes is floating vegetables. Once you pack your vegetables into the jar, any piece that pokes above the brine line is a prime target for mold. The brine is your protection, and anything exposed to air is not protected. This is why you need to pack the vegetables down firmly, leaving about an inch of headspace at the top of the jar.
Weigh everything down if you need to. Many wide-mouth mason jar recipes use glass weights, which fit perfectly inside. In a pinch, you can use a smaller glass jar filled with water as a weight, but honestly, the glass discs are worth the small investment. When I packed my very first jar, I was too gentle. I thought the vegetables would just magically stay submerged. They did not. They floated, dried out at the top, and developed a fuzzy patch that made me toss the whole jar. Don’t throw away your hard work over this simple detail.
To keep this process simple, here is what you need before you start:
- Wide-mouth mason jars with glass lids (the plastic lids can retain odors)
- Fine sea salt or kosher salt, no additives
- A cabbage shredder or a sharp chef’s knife
- Glass fermentation weights (optional but highly recommended)
- Four to seven days of patience while it sits on your counter
Airflow, Lids, and the Question of Burping
This is where a lot of people get nervous. The fermentation process produces carbon dioxide, which builds up pressure inside the jar. If you use a metal lid screwed on tight, pressure can build and either pop the lid off or shatter the glass. That is why the jars in that photo have glass lids with a rubber seal. They allow some pressure to escape while keeping air out.
If you are using a regular metal lid, just screw it on loosely and press it down gently once a day to release the built-up gas, a process known as burping. Honest moment here: I often forget to burp my jars when I use those standard lids. The result is a fizzy mess that explodes when I finally open it, sending cabbage juice across my kitchen cabinets. Every single time. I have a scar on my counter from a particularly aggressive batch. So learn from my sloppy habits and set a daily alarm to burp your jars, or just get the airlock lids and skip the whole headache.
Temperature and Patience: The Waiting Game
The speed of your fermentation depends on the warmth of your room. In a warm kitchen (around 70 to 75 degrees Fahrenheit), your sauerkraut will ferment faster, sometimes in just three or four days. In a cooler spot, like a basement or a garage in winter, it can take two weeks or more. There is no right answer here, it is just about your preference for the final taste.
Taste it after a few days to see what you think. If it tastes like fresh cabbage with a tiny hint of tang, let it go longer. If you like that sharp, sour bite, you are done. The transformation of vegetables into sauerkraut is a living process, and the flavor changes daily. One day it is boring, the next day it is suddenly perfect. I usually start taste-testing at day four and end up moving the whole jar into the refrigerator by day six or seven. The cold stops the fermentation, which keeps the texture crisper.
Using Tomatoes and Carrots for a Different Flavor
Adding tomatoes to sauerkraut is not traditional German style, but it works beautifully. The tomatoes break down during fermentation, releasing their juices and blending into the brine, giving the whole batch a slightly tangy, almost savory kick. They also turn the brine a pinkish color, which honestly looks pretty great in those clear glass jars.
The carrots add a natural sweetness that balances out the sourness of the cabbage. Finely shred them so they integrate with the cabbage instead of staying in big, hard chunks. You do not want to bite into a massive raw carrot stick in the middle of tender fermented cabbage. It is like throwing a rock into a bowl of pudding. The texture should be consistent. Slice your garlic thin and tuck a few pieces in between the layers, they infuse the whole jar with a mild punch that sharpens as it ferments.
The Beginner’s Batch: Prep and Packing Sequence
The order of operations matters more than you might think. Start by mixing your shredded cabbage and salt in a big bowl and massaging it until it looks glossy and starts releasing liquid. Then, toss in your shredded carrots and tomato chunks. Now, pack this mixture into your jars in small handfuls. Push each handful down firmly with your fist or a wooden tamper before adding the next layer.
That firm packing removes air pockets and helps the vegetables stay submerged under their own juices. If after all that packing, the liquid does not cover the vegetables, you need to add a little extra. Dissolve a teaspoon of salt in a cup of filtered water and pour in just enough to cover the top. Chamomile tea works too, but that is a tangent for another day. Just make sure everything is submerged. I remember one batch where I was convinced there was enough liquid, then watched in horror as the top layer turned brown and dried out. The brine is your friend, it is your safety net.
Common Fixes for Slime and Softness
Sometimes things go wrong, and that is part of learning. If your fermented vegetables turn mushy, it is often because the temperature was too high, which speeds up fermentation and breaks down the cell walls. If they turn slimy, you might have used too little salt or iodized salt. Taste a tiny piece, if it smells unpleasant or looks anything other than appetizing, trust your nose and throw it away.
Your fermented vegetables should look vibrant, smell tangy and slightly sour, and taste bright. The photo of those three jars is exactly what a successful batch looks like, colorful, snug, and full of brine. Trust the process and trust your senses. As long as the vegetables smell like food you want to eat, they probably are. Once you master this basic recipe, you will never look at a jar of store-bought sauerkraut the same way again.
So, there you have it, the messy, fascinating, and delicious world of mason jar fermentation. Grab a head of cabbage, some carrots, a tomato or two, and give it a shot. You have everything to gain and nothing to lose but a little bit of counter space.
Leave a Comment