How to Get a Wood Ceiling on a Budget
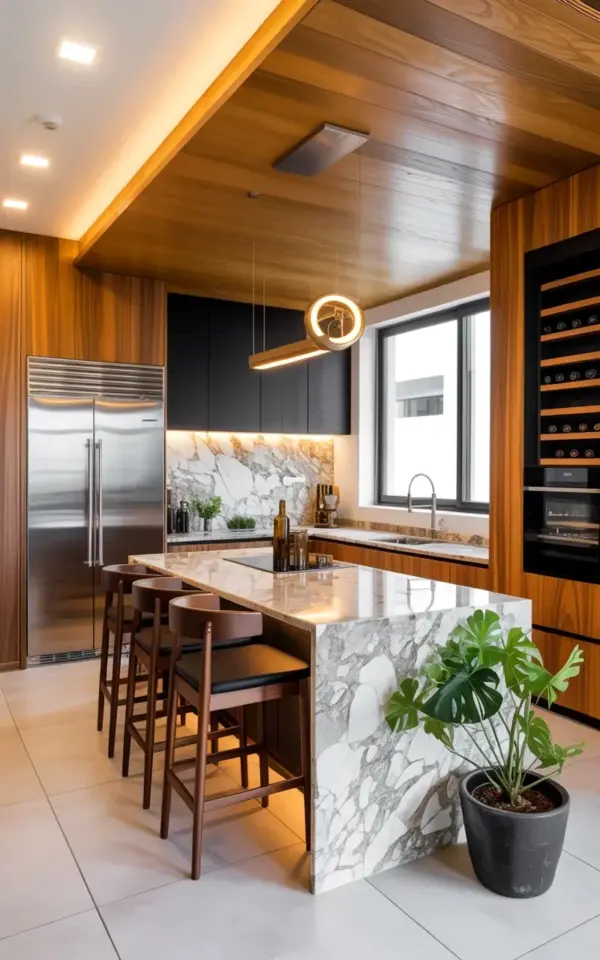
So you saw that photo with the warm wood panel ceiling and the marble island, and your first thought was probably “that costs a fortune.” I get it. That’s exactly what I thought when I first spotted this modern luxury kitchen look. But here’s the thing: the wood ceiling you’re drooling over? It’s not real hardwood. Not even close. You can use peel-and-stick wood planks. I’m serious.
Look, I spent an entire weekend installing them in my own kitchen. The cheap ones from the home store. And honestly, they look fantastic. The trick is to stagger the planks so the seams don’t line up, and to use a dark stain or a warm walnut tone. My neighbor did it in her dining room and we both laughed at how easy it was. You don’t need a contractor. Just a measuring tape, a utility knife, and a little patience.
One weird thing I learned: peel-and-stick planks stick best if you wipe the ceiling with rubbing alcohol first. I skipped that step on my first attempt and ended up redoing half the ceiling because a plank fell off at 2 AM. Not fun. So yeah, prep your surface. It matters.
The Marble Island Illusion (That Actually Saves Money)
Real marble is gorgeous. It’s also absurdly expensive and stains if you look at it wrong. I once spilled red wine on a marble countertop at a friend’s house and she nearly cried. No thank you. The solution? Quartz with veining. You can get slabs that look exactly like Carrara marble for a fraction of the price. Seriously, I walked into a stone yard and thought the quartz sample was real marble until I touched it.
The waterfall edge on that island you saw? Yeah, that’s totally doable with quartz too. You order a slab cut to size with a waterfall overhang. It costs more than a standard edge, but way less than real marble. And you never have to seal it. I love not sealing things. My bathroom grout is a mess, but my countertops are pristine. That’s a win.
If you’re on a super tight budget, there are also marble-look porcelain slabs. They’re lighter, easier to handle, and even cheaper. But they don’t have that same smooth, cool feel. Pick your battles. For me, the quartz is worth the extra hundred or so bucks.
Black Framed Windows and Dark Bar Stools (Pulling It All Together)
Notice the big window with black frames in that kitchen photo? That’s not a random choice. Black frames create contrast against light walls and bring a modern edge. If you don’t have black-framed windows (and let’s be honest, most of us don’t), you can fake it. Seriously. Add black window film or paint the existing frames with matte black paint. My sister did that and it took her an afternoon. She used painter’s tape and a small brush. No professional painter required.
The dark bar stools are another key piece. The ones in the image are dark brown wood with black cushions. You can find them at IKEA or Wayfair for under $200 each. I found a set of four at a thrift store for forty bucks and spray-painted the legs black. They look amazing. The black cushions tie into the window frames and the black upper cabinets. It’s a cohesive look without being matchy-matchy.
One thing I’ll admit: I spent way too long obsessing over stool height. Standard counter height is 36 inches, so stools should be 24 to 26 inches tall. Get it wrong and you’ll be eating dinner at chin level. Not a good look. Measure twice, buy once.
White Marble Backsplash and Black Upper Cabinets: A Balanced Palette
The backsplash in this kitchen is white marble with gray veining. But you know what? Actual marble backsplash tiles can be a pain to keep clean. I’d go with large-format marble-look ceramic tiles. They’re waterproof, easy to wipe, and they come in sheets so installation is faster. I did my own backsplash last summer and it took a weekend. The key is to use a level and spacers. Otherwise your tiles will look drunk. I learned that the hard way.
And black upper cabinets? That’s a bold move. But it works because the marble island and wood ceiling keep the space from feeling like a cave. If you’re scared of painting all your upper cabinets black, try just the ones above the sink or stove. That’s what I did. It adds drama without overwhelming the room. Plus, black hides crumbs and smudges. So if you’re a messy cook like me, that’s a blessing.
Here’s a quick list of things you can swap to save money on this exact look:
- Real wood ceiling → Peel-and-stick wood planks (under $100 per room)
- Real marble island → Quartz or porcelain with veining (save 50-70%)
- Custom black window frames → Paint your existing ones matte black (cost: a can of paint)
- Designer bar stools → Secondhand stools with a fresh coat of paint (under $50 total)
- Marble backsplash → Large-format ceramic marble-look tile (easy DIY, save on labor)
- Black cabinetry → Paint your existing cabinets (use high-quality primer, sand first)
Practical Tips for Shooting This Look Without Breaking the Bank
Ok so you’ve got the wood ceiling, the quartz island, the black stools. Now what? Lighting. That’s the thing most people forget. In the photo, the warm wood ceiling catches the light just right. You need warm white bulbs (2700K), not those harsh cool-white LEDs. I switched out all my bulbs for warm ones and my kitchen instantly looked ten times more expensive. Not joking.
Another tip: don’t skimp on the hardware. The black cabinet pulls and the faucet finish matter. If your budget is tight, hit up a salvage store or Facebook Marketplace for cheap brass or black hardware. I found a set of eight handles for twelve bucks. They came from a hotel renovation. Bit of a weird story, but they’re perfect.
And honestly? The stainless steel refrigerator in the photo? That’s not fancy. It’s a standard model. You can find open-box deals at appliance stores. I got my fridge for 40% off because the box had a dent. The fridge itself was fine. Saved me $600.
Why This Kitchen Works (And How You Can Make It Yours)
The reason this modern luxury kitchen design feels so polished is because of the contrast. Warm wood vs. cool marble. Black frames vs. white backsplash. It’s not about expensive materials. It’s about balance. You can swap in budget versions of every single element and still get that high-end feel. I’ve done it. My cousin did it. Your neighbor can do it too.
One last thought: don’t be afraid to leave some parts imperfect. My wood planks have a tiny gap in one corner because I measured wrong. I filled it with wood filler and stained it. You can’t even tell. And if you can tell, who cares? It’s your kitchen. Not a magazine spread. The goal is to make a space you love spending time in, not to win an interior design award.
So go ahead, grab some peel-and-stick planks and a quartz sample. You’ve got this. And if you want more ideas like this, save that Pinterest pin and come back when you’re ready to pick your paint colors. I’ll be here, probably staining something I shouldn’t. 😅
#modernluxurykitchen #budgetkitchenideas #kitchendesigninspiration #woodpanelceiling #marbleisland